Counting Posts per User per Month in WordPress

Had an interesting problem land on my plate today. A corner-office type wanted to know how many posts per month each of our authors had written. Sounds like a round of layoffs are coming, eh?

I hadn’t written any SQL in a LONG time but I managed to finally figure it out. Certainly it was faster than trying to add things up by hand (we have 17 brands we need this data for). Figured I’d save the queries in case I ever need them again. I am not saying this is the most efficient way to do this — I’m no DBA — but for a 1 time thing, it worked.

SELECT t.year_month, users.user_nicename, users.user_email, count(post_author)
FROM
(
SELECT DISTINCT(EXTRACT(YEAR_MONTH FROM `post_date`)) as `year_month`
FROM wp_posts
WHERE post_date > "2021-01-01 00:00:01"
ORDER BY `year_month` ASC
) as t,
wp_users users,
wp_posts posts
WHERE
posts.post_author = users.ID AND
EXTRACT(YEAR_MONTH FROM posts.post_date) = t.year_month AND
posts.post_status = 'publish' AND
posts.post_type IN ('post', 'company', 'download', 'event', 'page', 'podcast', 'product', 'webcast')

GROUP BY posts.post_author, t.year_month
ORDER BY posts.user_nicename, t.year_month ASC

In my case the request was for the past 2 years, so we’re starting at 2021-01-01.

The EXTRACT(YEAR_MONTH FROM `post_date`) was a new syntax for me.

So the posts.post_type IN line will have to be customized for your site; it depends on what content types you want to count. For this site we have a few custom content types. For a “vanilla” wordpress site IN (‘post’, ‘page’) should work.

This query sorts by author first, so you have 24 (since I’m grabbing 24 months of data) rows for the first user, then 24 for the next, and so on.

SELECT t.year_month, users.user_nicename, users.user_email, count(post_author)
FROM
(
SELECT DISTINCT(EXTRACT(YEAR_MONTH FROM `post_date`)) as `year_month`
FROM wp_posts
WHERE post_date > "2021-01-01 00:00:01"
ORDER BY `year_month` ASC
) as t,
wp_users users,
wp_posts posts
WHERE
posts.post_author = users.ID AND
EXTRACT(YEAR_MONTH FROM posts.post_date) = t.year_month AND
posts.post_status = 'publish' AND
posts.post_type IN ('post', 'company', 'download', 'event', 'page', 'podcast', 'product', 'webcast')

GROUP BY t.year_month, posts.post_author
ORDER BY t.year_month ASC

Same data, different format. This one orders by date, so you get a row for each author for Jan 2021, then a row for each author for Jan 2022 and so on.
Building a Feed from WordPress’s REST API

For reasons not worth elaborating on, I was tasked with building a feed based on WordPress’s REST API (as opposed to pulling in an RSS feed). This was a new experience for me.

The default URL to grab posts is /wp-json/wp/v2/posts, so for example https://smithtalkstech.com/wp-json/wp/v2/posts

That is sufficient if you just want the text of the posts you want to pull in, but you probably want some kind of images too, right? Perhaps whatever you’re using for a thumbnail. I don’t actually use featured images here so this blog is a terrible example, but suffice to say that /wp-json/wp/v2/posts will pull in links to the attachment page, but not the actual image URLs.

So you’ll find something like wp:featuredmedia blah blah href: mysite.com/wp-json/wp/v2/media/8794

You could then do another call to that URL and get all the data, including the URL to the image, but there’s a slightly easier way: append ?_embed to the end of your URL: https://smithtalkstech.com/wp-json/wp/v2/posts?_embed

Now you’ll have an _embedded node in your JSON that holds what you need, but gotta dig down a few levels
_embedded -> wp:featuredmedia -> 0 -> media_details -> sizes -> thumbnail {for example} -> source_url

If you’re like me, some of those special characters will throw you off. Here is a working example:

$mediaUrl = $obj->_embedded->{'wp:featuredmedia'}[0]->media_details->sizes->{'post-thumbnail'}->source_url;

$mediaURL now holds the URL to your thumbnail image.

$obj is the json object. In this case I was grabbing a custom image size called post-thumbnail

Putting wp:featuredmedia inside quotes inside curly braces was new to me.

Everything else is pretty easy. $obj->link for the URL of the post, $obj->title->rendered for the post title, $obj->content->rendered for the post content, and so on.

I highly suggest using Firefox to look at these json files since it formats stuff for you. Or snag a json viewer extension for your favorite browser.

By the way, by default you’ll get 1 page of 9 posts. You can control how many posts you get by appending a per_page value.

So say I wanted the most recent 3 posts (and I want the embed stuff): https://smithtalkstech.com/wp-json/wp/v2/posts?_embed&per_page=3

Here’s the full documentation for /posts: https://developer.wordpress.org/rest-api/reference/posts/

Adding Fonts to the Divi Builder Menu

The company I work for has been migrating a lot of sites to Divi, the WordPress Theme. I’m not really a fan of Divi but I also wasn’t in the meetings when the decision was made so… I’ve had to start learning Divi.

The other day a designer asked about using custom fonts on a site. In this case it was a TrueType Font. I uploaded the actual file to the server and added the font family via CSS:

@font-face {
font-family: 'KansasNew-Regular';
src: url('/wp-content/themes/divi-child/assets/fonts/KansasNew-Regular.ttf');
}

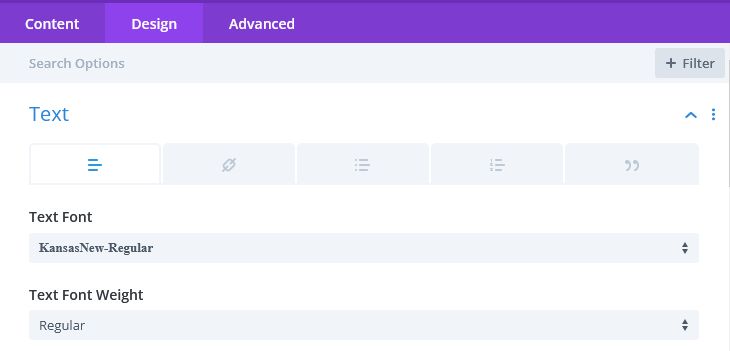
So basic stuff, but the user wanted to be able to pick the font from the font drop down in the Divi Builder:

Divi Builder Font Selector

This was trickier but after some searching I found the solution at Ville Teikko’s site. As is so often the case with WordPress it comes down to using a filter. Teikko says you need to bundle your font into a web-font kit but, maybe since my needs were very simple (a single typeface) I got away with not doing that.

Here’s the filter that worked with the CSS above:

add_filter('et_websafe_fonts', 'load_divi_custom_font', 10, 2);

function load_divi_custom_font($fonts) {

$custom_font = array('KansasNew-Regular' => array(
'styles' => '400,700',
'character_set' => 'latin',
'type' => 'serif',
'standard' => 1
));

return array_merge($custom_font,$fonts);
}

Knock on wood, so far it seems to be working. I’ll update the post if we run into any issues over time.

Layering Icons with Font Awesome

I’ve been playing around with using Font Awesome for icons lately. This is pretty common knowledge stuff but that doesn’t mean I won’t forget how to do it so figured I’d best write it down.

Step 1 of course is including Font Awesome inside your head tags. Something along the lines of this:

<link rel="stylesheet" media="all" href="https://cdnjs.cloudflare.com/ajax/libs/font-awesome/6.1.1/css/all.min.css" />

The simplest way to add an icon is just by adding a class to an empty tag:

<class="fa-solid fa-dungeon"></i>

From that code we get this:

OK but where does that code come from? You have to look it up on the Font Awesome site. Make sure you click the “Free Icons” toggle unless you’re paying for FA.

You can change the color of the icon via CSS in the same way you’d change any text color. You can change the size the same way (via font-size) OR you can add more classes:

<class="fa-solid fa-dungeon fa-lg"></i>

results in:

There are also literal sizing classes: fa-1x, fa-2x… fa-10x
You can read up on sizing icons in the official documentation.

So at long last let’s get to layering, which is the point of this blog post. Layering is my term, Font Awesome calls it stacking which is more accurate but in my brain I liken it to layers in a graphics program. Here’s their documentation on it.

And here’s an example.

This is the code behind that icon. This is 3 stacked icons: a solid circle, the RSS icon, then a hollow circle. Initially the hollow circle is the same color as the solid circle, but it changes color on hover (roll your mouse cursor over it to see what I mean). Note that you need a span or something wrapping all your layers.
<a href="https://smithtalkstech.com/feed/">
<span id="rss_icon" class="fa-stack fa-lg">
<i class="fa fa-circle fa-stack-2x icon-background"></i>
<i class="fa fa-rss-square fa-stack-1x rss-icon"></i>
<i class="fa-regular fa-circle fa-stack-2x icon-border"></i>
</span>
</a>

So what does this all mean? The first span is a container for the stacked icons. The fa-stack class is what indicates this is a container for stacked icons. If you’re interested, here is the CSS behind fa-stack:

display: inline-block;
height: 2em;
line-height: 2em;
position: relative;
vertical-align: middle;
width: 2.5em;

fa-lg is controlling the size of the icon stack

For the first actual icon, the combination of “fa fa-circle” are the classes for a solid circle, fa-stack-2x sets this to be twice as large as the standard size (as set by the container).

The next icon replaces fa-circle with fa-rss-square, which shows the RSS icon. fa-stack-1x makes it the standard size, so half as big as the solid circle.

And finally the last icon is from a different ‘set’ of Font Awesome icons, so starts with fa-regular (instead of fa) and then fa-circle. I know this is a little confusing, but “fa fa-circle” is a solid circle, while “fa-regular fa-circle” is a hollow circle. These values all come from looking them up on the Font Awesome site. Finally fa-stack-2x makes the hollow circle twice the standard size, or the same size as the solid circle.

The icon-background, rss-icon and icon-border classes are my classes that I use in local css to set colors and so forth.

If you’re curious about the actual shapes, here’s the CSS for fa-rss-square, or more technically the before pseudo element for fa-rss-square

.fa-rss-square:before, .fa-square-rss:before {
content: "\f143";
}

So just the hex code of the character that Font Awesome uses for the RSS icon, I guess.

And that’s about as far as I’ve taken this. I’m not 100% convinced this is easier than just making some small gifs to use as icons, but I’ll admit it’s pretty convenient once you have Font Awesome installed on a site. Just look up the icon you want and paste in the classes and bam!

Fixing “OneDrive Cannot Connect to Windows” error

Recently I started having an issue with my Windows 10 laptop where I’d get the error “OneDrive Cannot Connect to Windows” after a restart. This disabled OneDrive’s “Files on Demand” feature which I lean on heavily given my laptop only has a 500 GB SSD.

Looking in the system logs, I saw this error:

Session "Cloud Files Diagnostic Event Listener" failed to start with the following error: 0xC0000022

Found it under Kernel-EventTracing.

The ‘band-aid’ fix for this is to open an elevated shell and run:

netsh int ip reset

Then restart. This would fix things until the next restart, which is nice but not ideal.

A longer term (though still not ideal) solution is to disable Fast Start: Settings -> System -> Power & Sleep -> Additional Power Settings -> Choose what the power buttons do -> disable “Turn on fast startup” under shutdown settings.

I am hoping that will be a permanent fix; will report back with results. This appears to be a bug introduced in a recent version of Windows 10 as I’ve seen a lot of talk about it recently.

Changing Icon Colors in UI Kit (and SVGs in general)

For a new project I’m working on, I’m learning UI Kit; I have never done much in the way of front end development so I’m like a babe in the woods when it comes to CSS Frameworks.

Today’s challenge: Icons. UI Kit includes support for SVG icons. I needed a star on a navbar and UI Kit could give me one. Why not use it?

The UI Kit documentation says “This component injects SVGs into the site, so that they adopt color and can be styled with CSS.”  Problem is it doesn’t offer any details on this, assuming I guess that you know how to style SVGs. I didn’t.

Here’s how to insert a star icon:

<span uk-icon="icon: star"></span>

That worked but it gave me an open star  and I needed a filled star 

Seems like it should be easy enough, right? I tried assigning a color to the class and that worked on the stroke but didn’t fill the star.
In the end I inspected the hollow star (in a browser) and here’s what I found:

<span class="uk-icon" uk-icon="icon:star">
<svg width="20" height="20" viewBox="0 0 20 20" xmlns="http://www.w3.org/2000/svg" data-svg="star">
<polygon fill="none" stroke="#000" stroke-width="1.01" points="10 2 12.63 7.27 18.5 8.12 14.25 12.22 15.25 18 10 15.27 4.75 18 5.75 12.22 1.5 8.12 7.37 7.27">
</polygon>
</svg>
</span>

OK now we know what we’re aiming at. I’d read a lot of ‘how-to’ posts on dealing with SVGs and they made it seems simple: just use fill: color like this:

.uk-icon { 
fill: yellow; 
}

That didn’t work and it turns out the <polygon> tag of the SVG was mucking things up. So to make a long story slightly less long, here’s the CSS I wound up using. For grins I’m going to give our star a black outline:

.uk-icon[uk-icon="icon:star"] svg {
    color: black;
}

.uk-icon[uk-icon="icon:star"] svg polygon{
    fill: yellow;
}

So first (.uk-icon[uk-icon=”icon:star”]) I’m making sure to target just the star icon (I could get more specific in case I need a blue star somewhere else). The first rule points at the svg and assigns the color black to the stroke (ie the outline).

The second rule goes one level deeper and targets the <polygon> tag inside the SVG, and NOW we can set the fill to yellow. And we wind up with this: So there ya have it. Now a few obvious points to address: I could’ve just gone and found a filled star gif or some other svg or used Font Awesome or something, I know. But I learned a lot by spending the time to figure this out.

Second, yeah next thing to figure out is how to align it to the text better. 🙂

Controlling load order of enqueued WordPress scripts and stylesheets

Another in a long line of stuff that is easy to do once you find out how to do it.

I was working on a WordPress theme and I wanted to incorporate UI Kit into this theme. I was trying to be a good WordPress citizen and so was enqueueing both UI Kit’s CSS and my main CSS. I’m honestly not convinced this is necessary for a theme you’re building for a specific site but what the heck.

My concern was, UI Kit has a lot of default styles that I was intending to over-ride [we weren’t organized enough for me to go with a custom UK Kit theme] in my style.css file, so it was important that style.css get loaded last.

So, we need to do two calls for the enqueueing. First we load up UI Kit’s CSS and javascript files:


function mytheme_scripts()
{
// UI Kit
wp_enqueue_style('uikit', get_template_directory_uri() . '/css/uikit.min.css');
wp_enqueue_script('uikit', get_template_directory_uri() . '/js/uikit.min.js');
wp_enqueue_script('uikit_icons', get_template_directory_uri() . '/js/uikit-icons.min.js');

}
add_action( ‘wp_enqueue_scripts’, ‘mytheme_scripts’ );

Then we make a second add_action call to enqueue style.css, Note the trailing 99 in the add_action. That represents the priority, or order files will be loaded. The default is 10. 99 might be overkill but if we ever need to add something between the two we have ample ‘room’ to do so.


add_action('wp_enqueue_scripts', function(){
wp_enqueue_style('main-style', get_template_directory_uri() . '/style.css');
}, 99);

If we view source of the page it looks like this. WordPress still prioritizes style sheets before js, so style.css gets included after UI Kit’s css but before UI Kit’s javascript:

<link rel='stylesheet' id='uikit-css' href='https://dev.sample.local/wp-content/themes/sample/css/uikit.min.css?ver=5.3.3' type='text/css' media='all' />
<link rel='stylesheet' id='main-style-css' href='https://dev.sample.local/wp-content/themes/sample/style.css?ver=5.3.3' type='text/css' media='all' />
<script type='text/javascript' src='https://dev.sample.local/wp-content/themes/sample/js/uikit.min.js?ver=5.3.3'></script>
<script type='text/javascript' src='https://dev.sample.local/wp-content/themes/sample/js/uikit-icons.min.js?ver=5.3.3'></script>

Simple enough. One of those things where it took me longer to realize I could add a priority to add_action than it did to make the change.

Adding GD support to a Docker image

I had to create a new docker container to emulate a site we have working on older versions of MySQL and PHP (don’t ask, long story).

The CMS was failing spectacularly. After suspecting memory issues and other esoteric settings I realized it was much more basic: there was no GD support in this container and the plugin that manipulated images was dying without generating any error messages (thanks for that, plugin developer).

Long story short, here’s my Dockerfile to get GD support working. This was one of those “look at a bunch of stack exchange answers and kind of merge them together” solutions so I’m not 100% sure how universally it will work. The bits in red are what I added for GD support. Frankly I’m not sure about that RUN NUMPROC line… I need to research that more because I honestly don’t understand what it is doing.

EDIT: OK the -j parameter passed to docker-php-ext-install is the number of make jobs that can run concurrently (in order to speed up compilation). The RUN NUMPROC line is looking at how many CPUs you have and telling make it can run that many jobs at the same time.

Edit 2: As of April 2, 2019 I started running into problems where my docker build who throw up errors like this:
Failed to fetch http://deb.debian.org/debian/dists/jessie-updates/main/binary-amd64/Packages

Apparently Debian “Jessie” updates have been moved to the archives. The solution is to tweak the sources list, new line added in green
Solution comes from https://github.com/debuerreotype/docker-debian-artifacts/issues/66#issuecomment-476616579

Edit 3: When using PHP 7.4 (php:7.4-apache image specifically) the RUN docker-php-ext-configure gd line will fail. 7.4 version is in BLUE now. Use this INSTEAD of the “RUN docker-php-ext-configure gd” command in RED. You’ll note I’m only adding jpeg support; it is surmised by the Internet that png support is now baked in. I’ll update the post if I find that is not the case.

FROM php:5.6.38-apache

COPY 000-default.conf /etc/apache2/sites-available/000-default.conf
COPY php.ini /usr/local/etc/php/php.ini
RUN mkdir -p /etc/apache2/ssl/
COPY ./ssl.crt /etc/apache2/ssl/ssl.crt
COPY ./ssl.key /etc/apache2/ssl/ssl.key
RUN mkdir -p /var/run/apache2/

RUN sed -i '/jessie-updates/d' /etc/apt/sources.list # Now archived

RUN apt-get update -y && apt-get install -y zlib1g-dev libjpeg62-turbo libpng-dev libjpeg-dev

RUN docker-php-ext-configure gd --with-jpeg

RUN docker-php-ext-configure gd \
--with-png-dir=/usr/lib/ \
--with-jpeg-dir=/usr/lib/ \
--with-gd

RUN NUMPROC=$(grep -c ^processor /proc/cpuinfo 2>/dev/null || 1) \
&& docker-php-ext-install -j${NUMPROC} gd

RUN docker-php-ext-install pdo_mysql
RUN docker-php-ext-install mysqli
RUN a2enmod rewrite
RUN a2enmod ssl

EXPOSE 80
EXPOSE 443

Moving old images/files

Here’s a simple one for you. I had a directory with tens of thousands of files (images) and I needed to clean it up by moving all the images with a time stamp of 2016 or earlier into another directory.

Step 1 was figuring out how many days it has been between today and 12/31/2016 using this tool:
https://www.timeanddate.com/date/durationresult.html

I came up with 618

Step 2 was running this command:

find . -maxdepth 1 -mtime +618 -type f -exec mv "{}" ~/www/images_bak/uploads \;

Where
. = current directory
-maxdepth 1 = don’t go into subdirectories
-mtime +618 = files more than 618 days old
-type f = files only, no directories
-exec mv “{}” = we want to move the files, not remove them
~/www/images_bak/uploads = directory we want to move them to

Credit for this solution goes to user Jenny D at serverfault.com

I re-write these things cuz I can never find them twice… LOL

One thing to try when Wordfence breaks your server

I opened up my local copy of one of our sites today and… white screen. WTF, it was working fine the last time I used it. I hit reload and now I’m getting a server not found error. That’s weird.

So I check the log files and see this:

[Mon May 07 15:09:14 2018] [notice] Child 167276: Starting thread to listen on port 80.
[Mon May 07 15:09:16 2018] [notice] Parent: child process exited with status 255 — Restarting.
[Mon May 07 15:09:17 2018] [notice] Digest: generating secret for digest authentication …
[Mon May 07 15:09:17 2018] [notice] Digest: done
[Mon May 07 15:09:19 2018] [notice] Apache/2.2.31 (Win32) DAV/2 mod_ssl/2.2.31 OpenSSL/1.0.2e mod_fcgid/2.3.9 mod_wsgi/3.4 Python/2.7.6 PHP/7.1.7 mod_perl/2.0.8 Perl/v5.16.3 configured — resuming normal operations
[Mon May 07 15:09:19 2018] [notice] Server built: May 6 2016 10:19:53
[Mon May 07 15:09:19 2018] [notice] Parent: Created child process 50416
[Mon May 07 15:09:20 2018] [notice] Digest: generating secret for digest authentication …
[Mon May 07 15:09:20 2018] [notice] Digest: done
[Mon May 07 15:09:21 2018] [notice] Child 50416: Child process is running
[Mon May 07 15:09:21 2018] [notice] Child 50416: Acquired the start mutex.
[Mon May 07 15:09:21 2018] [notice] Child 50416: Starting 64 worker threads.
[Mon May 07 15:09:21 2018] [notice] Child 50416: Starting thread to listen on port 80.
[Mon May 07 15:09:23 2018] [notice] Parent: child process exited with status 255 — Restarting.

This repeated over and over. Apache was starting but when I attempted to load the site, it would crash. If I tried to load something simple that didn’t involve wordpress, everything worked fine.

Long story short, something had become foobar’d with Wordfence. Not blaming the plugin itself, I think I munged something up when I imported a fresh SQL dump. I usually don’t pull over wordfence directories but maybe I screwed up, who knows?

The fix is simple enough.

Step 1:
Delete everything in \public_html\wp-content\wflogs

Step 2:
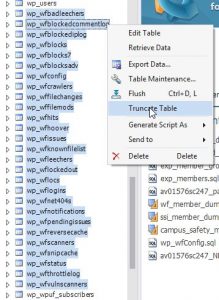
Truncate all the wp_wf* tables in your database.

Bam, problem hopefully solved. Wordfence will recreate the files you delete and re-fill that tables as it needs to. And your local will start to work again. Huzzah!

Now if it happens again, you might have a bigger issue. What turned out to be the problem in my case was that Wordfence was exhausting Apache’s memory, essentially. This only happened for me in a MAMP environment; I never ran into the issue with my Docker-based locals.

I fixed it by tweaking the Apache ThreadStackSize by inserting this into http.conf:

ThreadStackSize 8388608

Since I was on MAMP I had to edit a template. See this post for more on dealing with MAMP templates.

Apparently (I read this on the Internet so it must be true) MAMP sets a much smaller default stack size (1 MB) as compared to a typical Linux installation (8 MB). So the above ThreadStackSize pushes the size to the same as you’d find on linux.